If you’re overwhelmed by high bounce rates and low conversion, know you’re not alone.
Many e-commerce store owners share the frustration of visitors leaving their site too soon or not engaging enough to make a purchase. This issue often stems from a lack of immediate visual appeal and connection with the brand, leaving visitors unhooked and uninterested.
Creating visual and engaging hero images is one way to turn this around and make your website visitors more eager to explore and ultimately convert.
This guide discusses creating an appealing website hero image design that captivates and aligns with your brand messaging. We’ll also look at dynamic hero image examples to help you learn from the best.
What is a Hero Image?
A “Hero Image” is the term used in web design for a large banner image prominently placed on a web page, usually at the top. It’s often the first visual element a visitor encounters on the site.
Its size and prime location make the hero image incredibly effective at grabbing the viewer’s attention right when they land on the page.
A banner hero image serves multiple purposes, including:
- Establishes the Tone: The hero image is key in setting the website’s mood or tone, offering visitors insights into what the site or brand represents.
- Delivers Key Information: Hero images often contain a brand’s main messaging and value proposition. You can also use it to include specific campaigns or upcoming events.
- Boosts User Engagement: By pairing striking visuals with a call to action (CTA), the hero image can motivate users to dive deeper into the website or perform specific actions, like subscribing to a newsletter.
Strategies For Creating Website Hero Images for Your E-commerce Store
1. Understanding Your Brand and Audience
Before you design hero images for your website – or anything for that matter – begin by identifying your target audience and their preference. After all, all your efforts would be in vain if it doesn’t appeal to your visitors.
Start by identifying your brand identity, encompassing the visual, textual, and emotional attributes that define your brand. This includes your logo, color scheme, typography, and messaging tone.
Brands like Coca-Cola, with its iconic red, or Tiffany & Co.’s distinctive blue, have leveraged color to etch a memorable image in the minds of consumers, much like how pop culture icons become inseparable from their visual trademarks (think Marilyn Monroe and her classic white dress).
Another important step is to analyze your target audience and their preferences.
When identifying your target audience, consider:
- Basic audience demographics
- User behavior
- User preferences
- Emotional triggers.
The perfect hero image resonates with your audience while staying true to your brand’s identity.
It should reflect your offerings while giving a glimpse of your brand value and aesthetics that your audience will also appreciate.
Target’s hero images are a prime example of simplicity and brand consistency. They highlight toys on offer to directly appeal to customers looking for deals. This approach perfectly matches customers’ expectations and language, creating a strong connection.
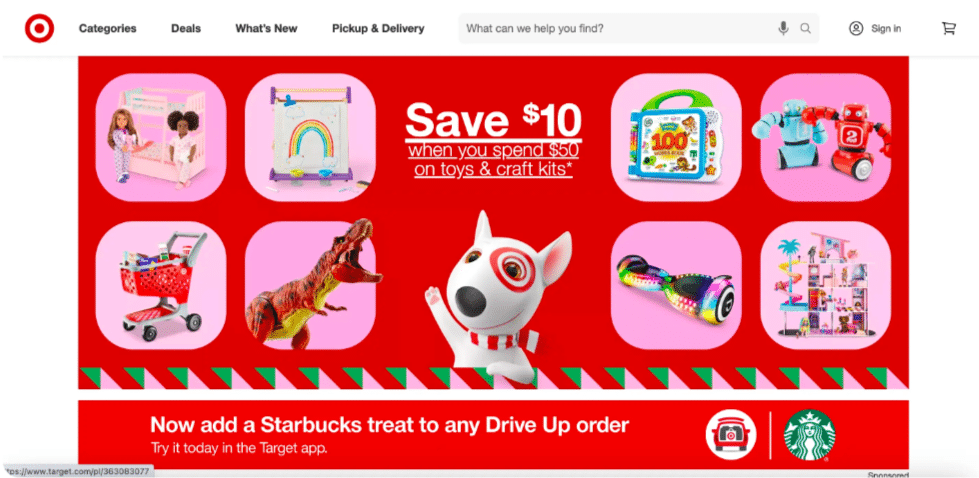
Plus, the clear call to action placed right in the middle of the image grabs attention and encourages conversions. This helps Target communicate its message, making it easy for the audience to engage and take action.
2. Consider Design Principles for Hero Images
Designing an effective hero image for your e-commerce store involves more than just selecting an eye-catching photo.
It requires a strategic approach to ensure the image captures attention and communicates your brand message.
When designing your hero image, consider the following design principles:
Clarity: The Key to Immediate Understanding
A hero image’s primary function is to convey a message or value proposition instantly. The image should be straightforward and clear so that users can immediately tell what your brand is about.
Tips for Clarity:
- Use simple backgrounds that don’t overshadow the main subject.
- Ensure the main message or product is the focal point.
- Avoid clutter and excessive elements that can dilute the message.
Here’s a good example from Florists:
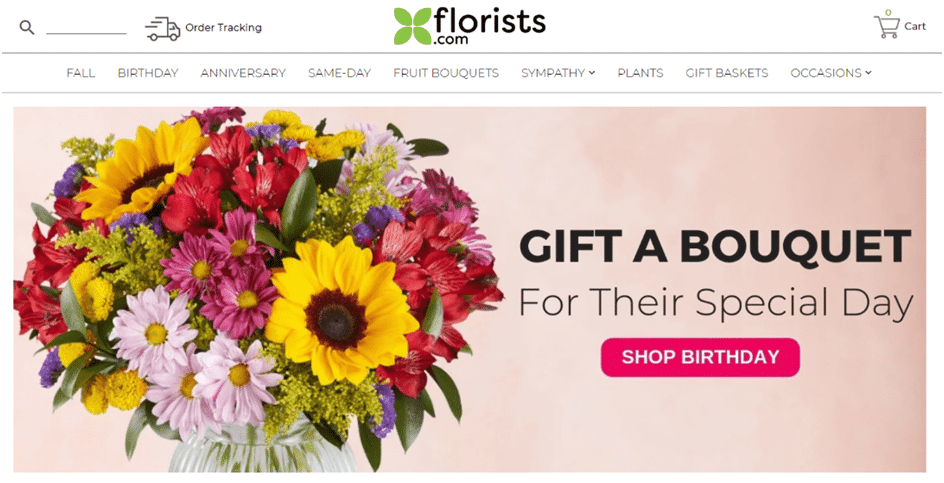
The hero image shows a flower bouquet in attractive colors and simple text about the company’s offerings. When you look at the image, you understand that the online shop offers flower delivery for special occasions.
Relevance: Aligning Image with Brand Message
Your hero image should directly correlate with your product and reflect your brand’s core values. At the same time, it should directly appeal to your target audience’s interests.
Tips for Relevance:
- Choose images that reflect your product’s use case or lifestyle appeal.
- Incorporate elements that resonate with your brand’s narrative.
- Tailor the imagery to match the interests and values of your target audience.
Quality: The Non-Negotiable Principle
The statistics show that 56.2% of marketers report that visual content plays a vital role in their marketing strategy, while a whopping 91% of consumers prefer visuals over plain text.
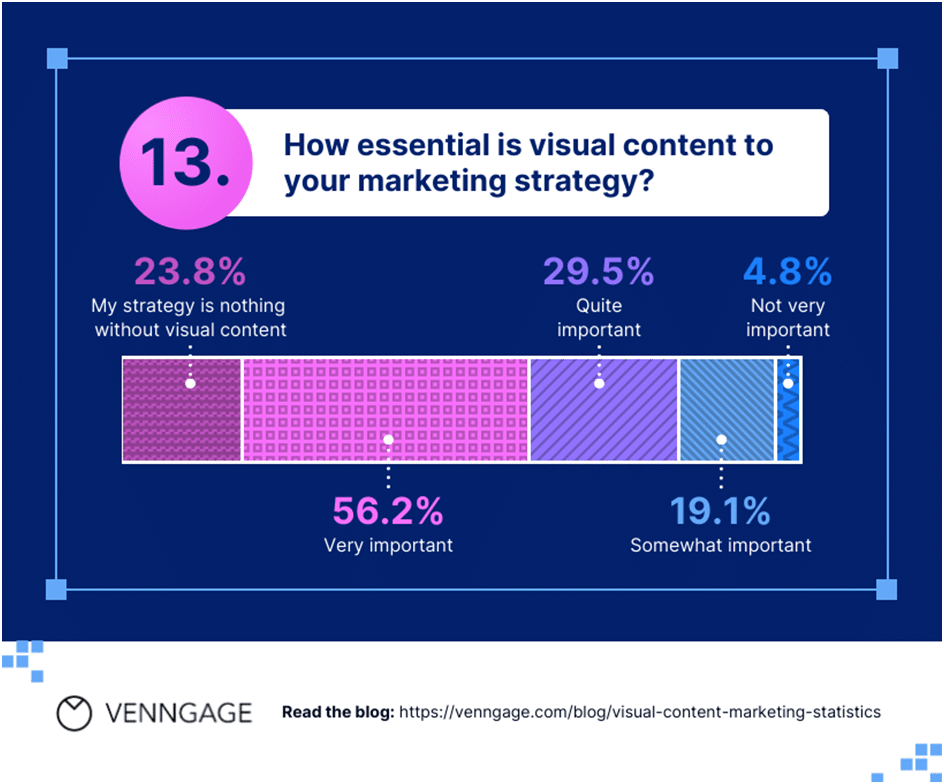
This is a testament to the power of high-quality visuals in capturing user interest and enhancing trust.
Tips for creating high-quality hero images:
- Hire a professional photographer or use high-quality stock photos.
- Opt for high resolution to ensure the image looks good on all devices.
- Pay attention to lighting, color balance, and sharpness to enhance visual appeal.
Composition: Crafting Visual Harmony
Composition is another important factor to consider when designing your hero image. A well-composed hero image can help direct the viewer’s attention to the intended elements.
Tips for composition:
- Use the rule of thirds to position key elements strategically.
- Balance different elements to avoid visually overwhelming the viewer.
- Ensure a clear visual hierarchy guides the viewer’s eye through the image.
3. Choosing the Right Content
Mere stock images don’t appeal to new-age customers. You have to set a narrative to catch and hold their attention, making it essential to choose the right content for your hero image and craft a compelling narrative.
It should grab attention and resonate with your audience on a deeper level. The narrative should also reflect your brand’s identity and audience preferences.
Brands usually consider two things when choosing a setting for their hero image:
- Product-Focused Imagery: These images put your product front and center, showcasing it in great detail.
- Lifestyle Imagery: Lifestyle images, on the other hand, place your product in a contextual setting, illustrating its use in real-life scenarios.
The choice between product-focused and lifestyle imagery depends on your product type and brand strategy.
For instance, tech products may benefit from clear, detailed shots highlighting innovation and features. At the same time, fashion and home decor perform better with lifestyle shots that evoke a sense of style or comfort.
Or, you could balance both and create your hero image’s setting around your product and real-life scenarios.
For instance, consider this hero image from Carstens, a provider of healthcare products. The hero image combines a view of their wall-mounted workstation shelf, showcasing the company’s offerings, with a scene that brings the product to life: a nurse attending to a patient.

This hero image succinctly highlights the functionality of Carstens’ products while depicting them within the everyday context of healthcare professionals, adding depth and relevance to the brand’s visual messaging.
4. Incorporating Supporting Text and Calls-to-Action (CTAs)
Your hero image isn’t just about the visual imagery. The text and the CTAs are a massive part of the overall portion, often significantly impacting your user engagement and conversion rates.
This strategic combination guides users on what steps to take next and clearly communicates your key message.
In fact, the text overlaid on your hero image, including the heading and supporting text, is the first piece of content users often read. It often conveys your brand’s value proposition or a specific campaign message, making it a critical element for setting expectations.
Here are some tips to remember when crafting text for a persuasive hero image:
- Keep it short and sweet. Limit the amount of text to ensure it’s easily readable at a glance. Aim for a powerful headline with a supporting subheadline if necessary.
- Contrast is key. Your text should stand out against the background for readability.
- Font matters: Choose a font that aligns with your brand identity and is easily read across devices.
CTA also plays an important role in guiding users toward taking a desired action. It could be signing up for your newsletter, purchasing, or even learning about a product.
Like the overlay text, your CTA should follow the same pattern. It should be clear and create a contrast to stand out against the background. The size should be large enough to be noticed but not so large that it overwhelms the image.
Don’t forget to use verbs that encourage action (e.g., Shop Now, Learn More, Get Started) and create a sense of urgency or benefit.
Pro Tip: Ensure the text and CTA hierarchy are clear, guiding the user’s eye through the message and toward the action button.
Consider this hero image example from Cocokind, an online skincare brand.
You’ll notice that the CTA button is placed right beneath the main heading and the supporting text, steering clear of the image’s busier sections. This is crucial as varying screen sizes can crop images unpredictably, sometimes obscuring important elements.
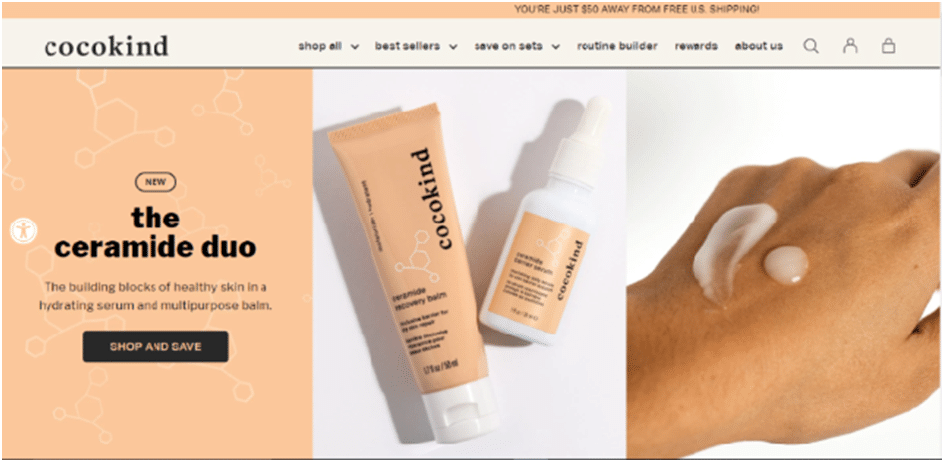
The button stands out, inviting users to click and start shopping immediately. At the same time, it complements the overall design well without appearing misplaced.
5. Incorporating Storytelling Elements
Adding storytelling elements to your hero image can turn a simple visual into a compelling narrative that engages users emotionally. This encourages them to explore further and connect with your brand more deeply.
Storytelling in marketing is not just about telling a story. It’s about conveying feelings, values, and experiences that resonate with your audience, making your brand stand out.
Here are some important tips to help you incorporate storytelling into your hero image:
- Focus on your audience’s journey: We began by understanding our audience’s needs, desires, and challenges. Use that information to create your hero image, depicting a scenario or emotion reflecting their journey.
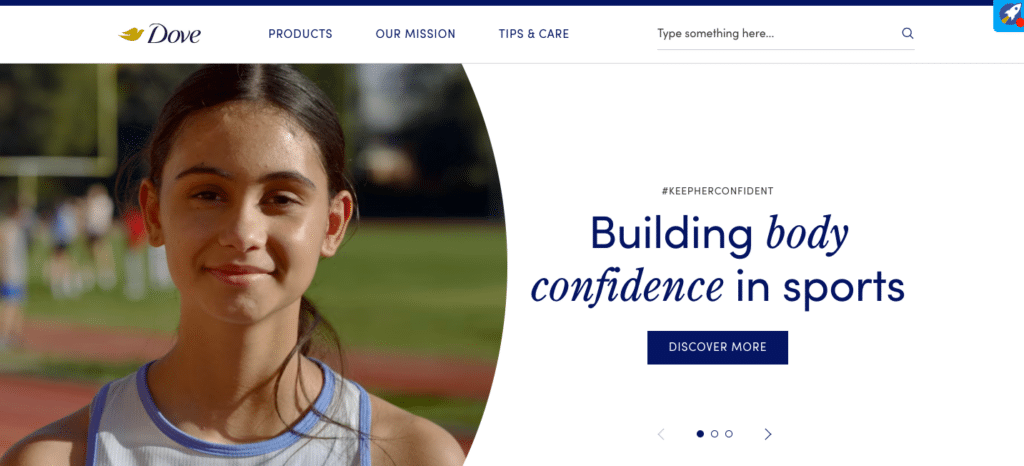
Use authentic imagery: Choose images representing real-life scenarios related to your product or service. Authenticity strengthens the narrative, making the story more believable and relatable. For example, Dove’s “Real Beauty” campaign uses genuine, diverse representations of beauty to challenge societal norms and connect with a wider audience.
- Incorporate symbols and metaphors: Symbols and metaphors can add depth to your story and convey complex messages in a visually simple manner.
- Create a visual sequence: If your platform allows, use a sequence of images or a slideshow in the hero section to tell a story over time. This will draw users in and encourage them to engage with your content further.
- Add contextual text: While the image should be powerful on its own, a brief, impactful piece of text can enhance the story, offering context or a CTA that aligns with the narrative.
6. Technical Considerations
We’ve covered a lot in terms of making your hero image stand out: weaving storytelling into it, ensuring it’s clear and understandable at first glance, picking the right context that resonates with your audience, and, of course, making it drop-dead gorgeous.
But there’s another crucial piece of the puzzle that will help people find your site and see this hero image we’ve been talking about – the technical side of things.
Getting this right means you’re not just creating something beautiful. You also ensure it appears in search engines and draws in the audience.
Here are some key technical considerations to remember to create a functioning hero image:
Image Optimization
High-quality images are often large in file size, slowing page load times. If you’re using animated hero images or graphic elements, they can be even slower to load.
According to a Google study, 53% of mobile users leave a site that takes longer than three seconds to load. This hints at optimizing your hero images for fast loading without compromising quality.
Here are some tips to optimize your hero image for speed while keeping the quality intact:
- Compress Images: Use tools like Adobe Photoshop, TinyPNG, or Squoosh to compress images without losing clarity.
- Choose the Right Format: JPEGs are ideal for photographs with lots of colors, while PNGs are better for transparent images. WebP, a newer format, offers high quality with smaller file sizes.
- Use Responsive Images: Implement different image sizes for different screen resolutions and devices using the srcset attribute in HTML, ensuring that the browser downloads the most appropriate size.
Responsive Design
Today’s audiences use different devices to browse the internet – from smartphones to tablets to desktops. If you don’t want to miss out on potential customers, you must ensure your hero image looks great on all screen sizes.
Responsive design adapts your hero image to provide an optimal viewing experience across various devices.
How do you create a responsive hero image on all device types? Here are some tips:
- Flexible Images: Use CSS to ensure images are scalable and don’t pixelate on larger screens.
- CSS Media Queries: Utilize media queries to apply different styles based on the device’s characteristics, like width, resolution, and orientation.
- Test Across Devices: Regularly test your hero image on multiple devices and browsers to ensure consistency in appearance and loading times.
Accessibility Considerations
Accessibility ensures that as many people as possible can use your website, regardless of special disabilities. This includes visually impaired users who rely on screen readers to navigate the internet.
The Web Content Accessibility Guidelines (WCAG) provide standards for making web content more accessible.
Here are some quick tips to help you create an accessible hero image:
- Alt Text: Provide descriptive alternative text for images, which screen readers can read aloud, allowing visually impaired users to understand the content. Keep the alt text under 8-10 words long and avoid keyword stuffing.
- Contrast Ratios: Ensure sufficient contrast between text and the background to make it readable for users with vision impairments.
- Keyboard Navigation: Ensure that your hero section and its CTAs are navigable using a keyboard for users who cannot use a mouse.
Pro Tip: Place a transparent color overlay between the text and the background image to get color contrast.

That said, it’s advisable not to use a transparent background in your image if you use .png.
7. A/B Test Your Hero Image Regularly
Continuously testing and analyzing the performance of your hero image can provide insights into how it engages users and contributes to your site’s overall goals.
Ensure you A/B test different images, text, and CTAs to identify what works best for your audience.
Use A/B testing tools like FigPii or Optimizely to make the process easier. They’ll help you test different hero images and see which versions perform better in terms of engagement and conversion rates.
Here are some more tips to help you conduct an effective A/B test for your hero image:
- Hypothesize Wisely: Start with a clear hypothesis based on insights from user behavior, analytics, or industry trends. For example, if data suggests users respond well to human faces, test a hero image with a person versus one without.
- Change One Element at a Time: To accurately measure the impact of a change, only alter one element (e.g., the image itself, overlay text, or CTA button) between the two versions. This isolation helps identify what exactly influences the outcomes.
- Use Significant Traffic: Your test should run long enough to collect significant data, typically until you have a statistically significant sample size. Depending on your site’s traffic, this might mean directing thousands of visitors through the test.
- Analyze Results Thoroughly: Look beyond just the primary conversion or click-through rate metric. Analyze secondary metrics like time on page, bounce rate, or even downstream conversions to get a full picture of the impact.
Your job doesn’t just end once you identify a winning variant and implement the changes. Continuous testing is key to ongoing optimization as user preferences and web trends evolve.
E-commerce Success with Visually Appealing Website Hero Images!
Designing website hero images for your e-commerce stores involves a bit of art and science.
You must identify your brand’s messaging and your target audience’s preferences while ensuring perfect visuals. By crafting hero image content that resonates with your brand, incorporating compelling text and CTA, and leveraging the power of storytelling, your landing page will stand out and improve user engagement and conversion rates.
However, the work doesn’t stop with creation. Regular A/B testing and technical optimization are also important to ensure your beautiful hero image continues to perform at its best.
With the right approach and continuous optimization, your hero image can become more than just a visual element. It can reflect your brand’s essence, helping you connect with your audience emotionally and drive e-commerce success.