


A test gets 25% more form submissions. Sounds like a win.
But what if most of those extra leads are unlikely to buy, and the number of customers does not increase?
That is why CRO teams cannot judge success by conversion rate alone. The right KPIs should show whether a change actually improved the business result you care about.
This guide covers which CRO KPIs to track and when to use them.
What are CRO KPIs?
CRO KPIs are the most important numbers you track to measure whether changes to your website are improving business results.
For example, if you change a product page, simplify a form, test a new headline, or redesign your checkout, you need a way to tell whether that change actually helped. Did more people buy? Did more qualified leads come through? Did more visitors book a demo? CRO KPIs help you answer those questions.
A good CRO KPI should do three things:
- First, it should be clearly tied to a business goal.
- Second, it should be actionable, meaning a team can respond to it and improve it.
- Third, it should be specific enough to show whether a test, page change, or funnel improvement is working.
CRO metrics vs CRO KPIs
Not every metric is a KPI. You can track lots of numbers on a website, including bounce rate, scroll depth, clicks, pageviews, form starts, and add-to-carts. But a KPI is different. A KPI is a metric that helps you align your CRO goals to business goals.
If your goal is to increase revenue, your KPI might be purchase conversion rate, revenue per visitor, or average order value. If your goal is to generate better leads, your KPI might be qualified lead rate rather than just total form submissions. If your goal is to improve SaaS growth, you might track trial signup rate, activation rate, or trial-to-paid conversion.
| CRO metrics | CRO KPIs |
|---|---|
| Any numbers you track to understand what visitors are doing on your site | The few numbers you track to judge whether your site is improving a business goal |
| They help you spot behavior, such as where people click, where they drop off, or whether they start a form | They help you measure outcomes, such as whether more people buy, book a demo, or become qualified leads |
| Examples: scroll depth, CTA clicks, form starts, add-to-cart rate | Examples: purchase conversion rate, revenue per visitor, qualified lead rate, demo booking rate |
| Useful for diagnosing problems | Useful for judging whether a page change, test, or redesign actually worked |
11 CRO KPIs that actually matter
KPIs that measure revenue and conversions
These KPIs are closest to the results most teams care about: more sales, more qualified signups, more demo bookings, or more revenue from the traffic they already have.
1. Conversion rate
Conversion rate is the percentage of visitors who complete the main action you want them to take, such as making a purchase, submitting a form, booking a demo, or starting a trial.
It’s often the first KPI teams look at because it’s one of the clearest ways to measure whether a page, funnel step, or test is performing better.
Here’s how to calculate the conversion rate:
Conversion rate = conversions ÷ total visitors × 100
For example, if 5,000 people visit a page and 150 of them complete the main action, your conversion rate is 3%.
Where to get it:
You can use GA4 to find your conversion numbers.
In GA4, use:
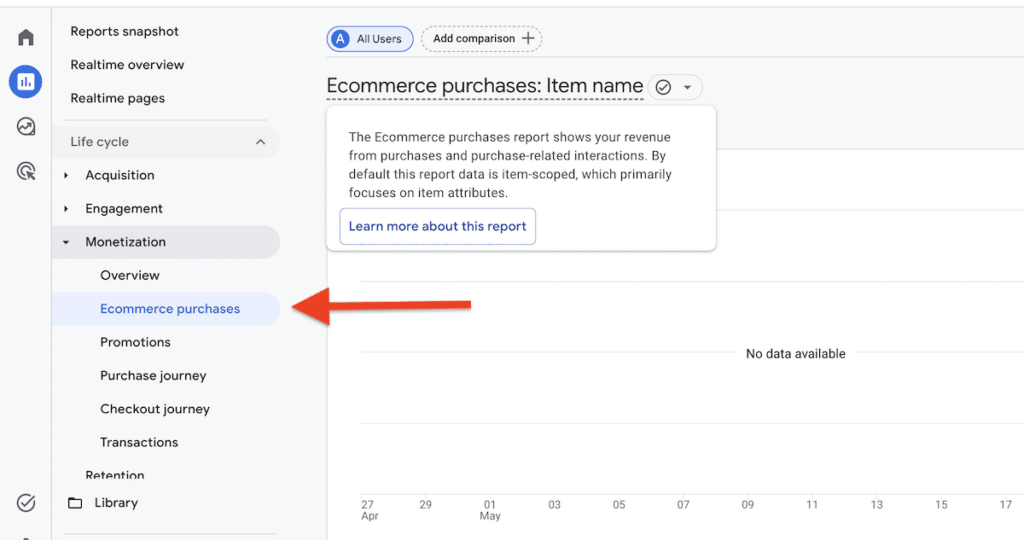
- Reports → Monetization → Ecommerce purchases if the conversion is a purchase
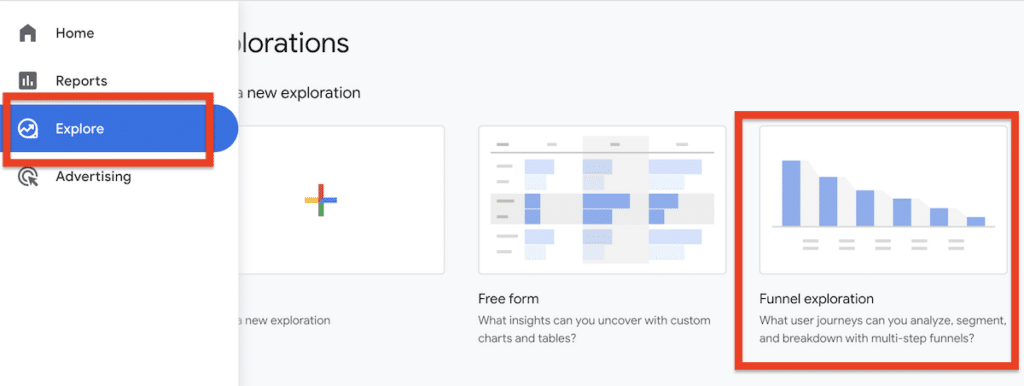
- Explore → Funnel exploration if you want to measure how many people moved from one step to the next and completed the final action
- Reports → Engagement → Events if you want to check how many times a form submit, signup, demo request, or other tracked action happened. Then compare that number with your page visitors or users for the same period. Google’s GA4 help describes engagement reporting and event-based measurement as the basis for this kind of analysis.
2. Revenue per visitor
Revenue per visitor shows how much revenue your site generates, on average, from each visitor. It is useful because it tells you whether your site is making more money from the traffic it already gets, not just whether more people are converting.
Formula: Revenue per visitor = total revenue ÷ total visitors
For example, if your site generates $12,000 in revenue from 4,000 visitors, your revenue per visitor is $3.
Where to find it:
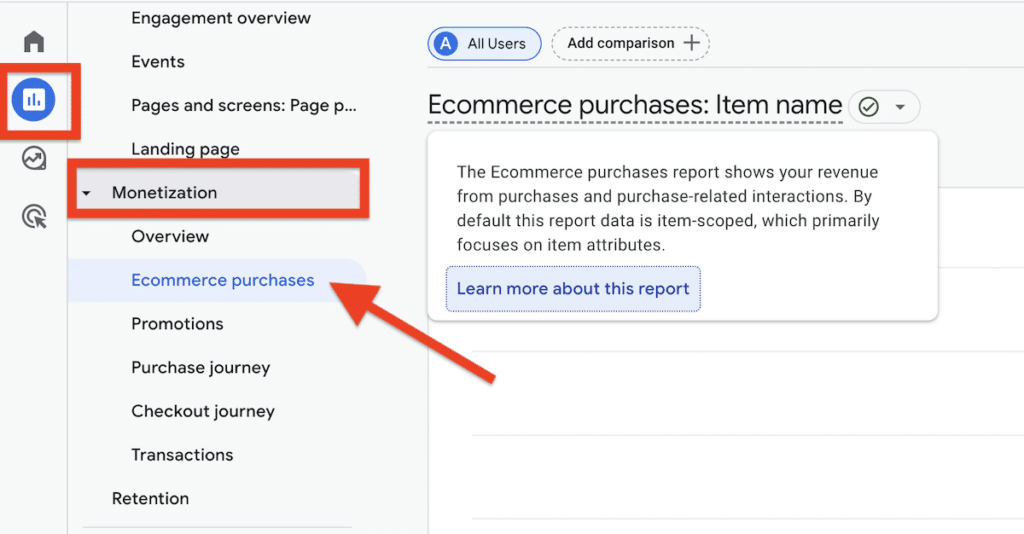
In GA4, go to Reports → Monetization → Ecommerce purchases to get your revenue number.
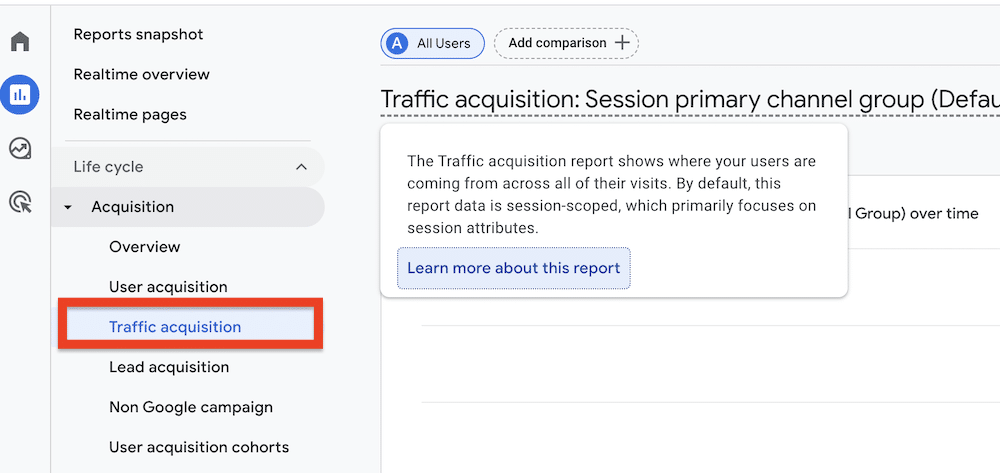
Next, go to Reports → Acquisition → Traffic acquisition to get your visitors for the same date range.
Finally, divide revenue by visitors to get revenue per visitor.
3. Average order value
Average order value shows how much each completed order is worth. It helps you understand whether customers are spending more when they buy, not just whether more people are placing orders.
This KPI is especially useful when testing bundles, upsells, cross-sells, free shipping thresholds, pricing presentation, or cart offers. In all of those cases, the goal is not only to get more orders but also to increase the value of each order.
Formula:
Average order value = total revenue ÷ total number of orders
For example, if your store made $10,000 from 200 orders, your average order value is $50.
Where to find it:
In Shopify, go to Analytics and look for Average order value on the dashboard.
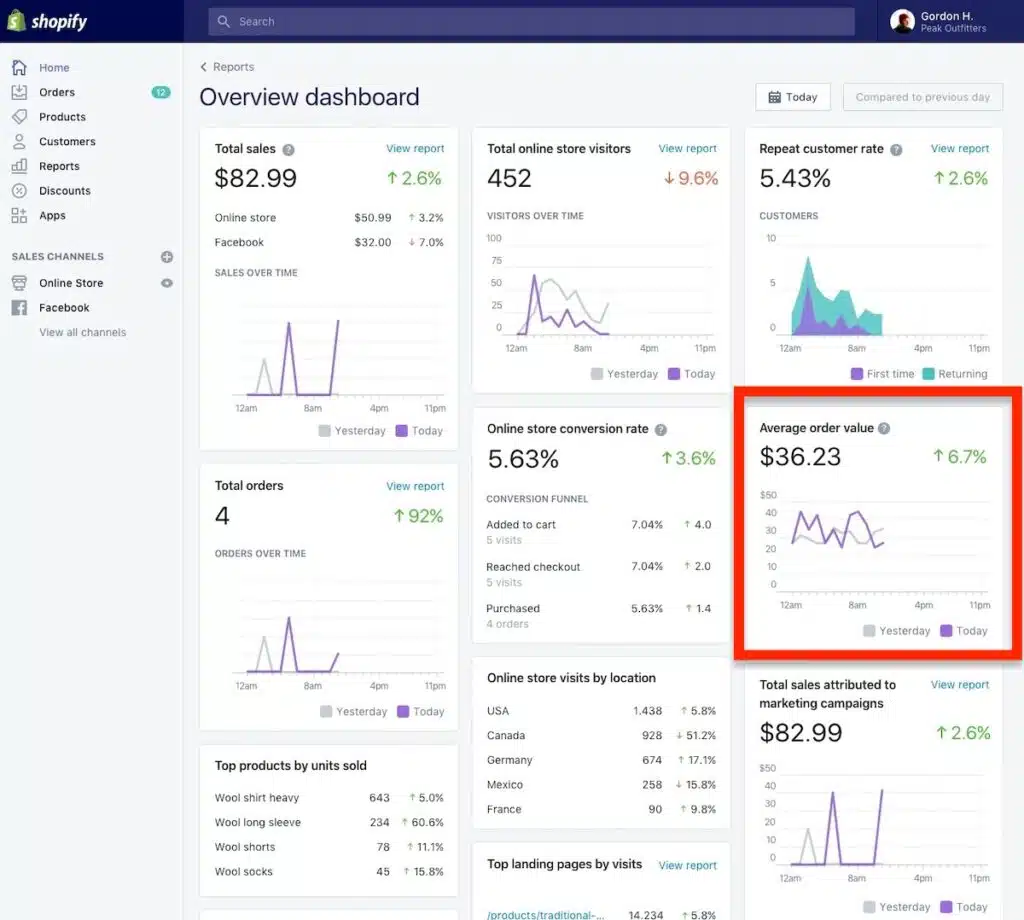
Shopify average order value metric (Source)
In GA4, you may not see this metric clearly in the default report. The easiest option is to pull purchase revenue from Reports → Monetization and divide it by the number of purchases/orders for the same date range.
4. Lead conversion rate/demo booking rate/trial signup rate
This KPI shows the percentage of visitors who take the next step you want them to take, such as submitting a lead form, booking a demo, or signing up for a trial.
For B2B, lead gen, and SaaS companies, this KPI is often more useful than purchase conversion rate because the website usually does not close the sale on the first visit. Its job is to get the visitor to take the next step, such as submitting a form, booking a demo, or starting a trial. Since revenue happens later, the purchase conversion rate is often too far removed from the page or test you are trying to evaluate.
Formula:
Lead conversion rate = leads ÷ total visitors × 100
Demo booking rate = demo bookings ÷ total visitors × 100
Trial signup rate = trial signups ÷ total visitors × 100
If 2,000 people visit your page and 80 book a demo, your demo booking rate is 4%.
Where to find it:
First, make sure GA4 is tracking the action you care about.
For example, if you want to measure form submissions or demo bookings, you need to set up that action as an event in GA4. Google explains that you need to either identify an existing event or create one, then mark it as a key event if it represents an important business action.
Once that is in place:
- Go to Reports → Engagement to check whether your form submit, demo request, or signup event is being recorded
- Go to Reports → Acquisition → Traffic acquisition to get your visitors for the same date range
- Divide conversions by visitors to get the conversion rate
If you want to see how people move through multiple steps before converting, use Explore → Funnel exploration. This report is built for step-by-step journeys and drop-offs.
KPIs that show where people move forward or drop off in the funnel
These KPIs help you see where people drop off in the funnel. A low overall conversion rate tells you the site is underperforming. These metrics help you see whether the problem is on the product page, in the cart, in checkout, or inside the form.
1. Add-to-cart rate
Add-to-cart rate shows the percentage of product page visitors who add an item to their cart. This is one of the clearest ways to judge whether your product page is doing its job.
Formula:
Add-to-cart rate = add-to-cart actions ÷ product page visitors × 100
If 1,000 people view a product page and 80 add the item to cart, the add-to-cart rate is 8%.
Where to find it:
In GA4, find your add_to_cart event and compare it with the number of product page visitors for the same date range.
What it helps you understand:
If traffic is reaching the product page but few people add to the cart, the problem is often on the page itself. The issue may be unclear product information, weak images, missing reviews, price shock, shipping concerns, or low trust.
2. Cart-to-checkout rate
Cart-to-checkout rate shows the percentage of users who move from cart to checkout.
Formula:
Cart-to-checkout rate = checkout starts ÷ carts created × 100
If 500 users add something to cart and 250 start checkout, the cart-to-checkout rate is 50%.
Where to find it:
In GA4, compare your begin_checkout event with your cart-related event count for the same period.
What it helps you understand:
This tells you whether people who show buying intent are motivated enough to continue. If this number is weak, the friction is often in the cart: unexpected shipping costs, unclear totals, distracting coupon fields, weak trust signals, or a poor cart experience.
3. Checkout completion rate
Checkout completion rate shows the percentage of users who complete their purchase after starting checkout.
Formula:
Checkout completion rate = purchases ÷ checkout starts × 100
If 300 users start checkout and 180 complete their purchase, the checkout completion rate is 60%.
Where to find it:
In GA4, compare your purchase event with your begin_checkout event for the same date range.
What it helps you understand:
This KPI helps you isolate friction inside checkout. If lots of users start checkout but too few finish, the problem may be forced account creation, too many fields, payment issues, lack of delivery clarity, or weak trust near the final step.
4. Form completion rate
Form completion rate shows the percentage of users who submit a form after starting it.
Formula:
Form completion rate = form submissions ÷ form starts × 100
If 120 people start a form and 60 submit it, the form completion rate is 50%.
Where to find it:
In GA4, this works only if both form starts and form submits are tracked as events. Then compare submissions with starts for the same date range.
What it helps you understand:
This KPI helps you spot friction inside the form itself. If many users start but few finish, the issue is often form length, unclear fields, privacy concerns, poor mobile UX, or too much effort required.
Depending on the funnel, you may also track form start rate, landing page conversion rate, onboarding completion rate, or other step-by-step funnel metrics. But the four above are usually enough to show where people move forward and where they drop off.
KPIs that measure lead quality
Once you know the lead volume, you need to decipher whether that person works at the right company, has a problem you can solve, can afford your product, or is ready to speak to sales.
That’s why lead volume should never be the only number used to judge a B2B landing page. In HubSpot’s 2026 marketing data, 40% of marketers named lead quality and marketing-qualified leads as their most important measure of success.
Before calculating lead quality, marketing and sales must agree on what a qualified lead looks like.
Use two sets of criteria:
- Fit: industry, company size, location, job role, revenue, or another requirement for becoming a customer
- Buying intent: requested a demo, asked about pricing, described an active problem, or showed another sign that the need is real
Once those criteria are clear, track these KPIs.
1. Qualified lead rate
The qualified lead rate shows the percentage of form submissions that meet your agreed-upon fit and buying-intent criteria.
Formula:
Qualified lead rate = qualified leads ÷ total leads × 100
Suppose a landing page generates 100 leads. Sales reviews them and finds that only 20 match your target customer and have a genuine need. Your qualified lead rate is 20%.
Now suppose a new version of the page generates only 80 leads, but 32 qualify. Its qualified lead rate is 40%.
The second page produces fewer form submissions, but twice as many qualified leads. Judging the test only by form conversion rate would lead you to choose the wrong version.
Where to find it:
Go to CRM → Leads. Filter the leads by the date they were created, then filter the lead stage to Qualified. Divide the number of qualified leads by all leads created during the same period.
You can also compare the qualified lead rate by:
- landing page
- traffic source
- campaign
- form
- test variation
This helps you see which pages and campaigns bring in people who sales can actually work with.
Lead-to-opportunity rate
Lead-to-opportunity rate shows what percentage of leads progress far enough for sales to create a real deal or opportunity.
Formula:
Lead-to-opportunity rate = leads that become opportunities ÷ total leads × 100
If your site generates 200 leads and 20 later become sales opportunities, your lead-to-opportunity rate is 10%.
This is more useful than the qualified lead rate alone because it checks whether the leads actually progress after sales review them. A lead may appear suitable on paper, but never reply, have no current budget, or have no serious purchase plan.
Where to find it:
In your CRM, pull all leads created during a set period. Then count how many of those same leads later entered the Opportunity stage or had a deal created.
Do not compare leads created this week with opportunities created this week. A lead may take several weeks to progress. Instead, follow one group of leads over a suitable period, such as 30, 60, or 90 days, depending on your sales cycle.
3. Lead-to-customer rate
Lead-to-customer rate shows what percentage of leads eventually become paying customers.
Formula:
Lead-to-customer rate = new customers ÷ total leads × 100
If 500 leads were generated and 15 eventually became customers, the lead-to-customer rate is 3%.
This is the clearest test of lead quality, but it takes longer to measure. You cannot judge it immediately after launching a page because many leads will still be moving through the sales process.
Where to find it:
In your CRM, select the leads generated during a specific period. Then check how many of those leads later reached Customer or Closed Won status.
Break the result down by page, campaign, traffic source, and test variation. This can reveal that one page generates many form fills but few customers, while another brings in fewer leads that close at a much higher rate.
How to choose the right CRO KPI for a test or initiative
The right KPI depends on what you are trying to change.
A checkout test, a lead-generation landing page, and a SaaS onboarding redesign should not all be judged by the same number. Before you launch anything, decide what business result the change is supposed to improve. Then choose the metrics that will tell you whether that happened, why it happened, and whether you created a new problem somewhere else.
A simple framework is:
Business goal → Primary KPI → Diagnostic KPIs → Guardrail KPIs → Relevant segments
1. Start with the business goal
Do not start by asking, “What metrics can we track?”
Start with:
What result are we trying to improve?
For example,
- Increase revenue – Generate more revenue from the same amount of traffic
- Increase qualified demos – Get more demo requests from companies that fit your target customer
- Improve onboarding completion – Get more new users through the steps they need to start using the product
- Reduce abandonment – Get more people who start a cart, checkout, form, or signup flow to finish it
Next, be specific.
“Increase conversions” is usually too broad.
For an ecommerce checkout project, a more useful goal might be:
Increase the percentage of people who start checkout and complete a purchase.
For a B2B landing page:
Increase the number of qualified demo requests without lowering lead quality.
For a SaaS onboarding flow:
Increase the percentage of new trial users who complete the setup steps required to use the core feature.
2. Pick one primary KPI
Your primary KPI is the metric you will use to assess whether the change achieved its goal.
The primary KPI should match the result the test is supposed to change.
For example:
| Initiative | Primary KPI |
| Redesigning product pages | Add-to-cart rate or revenue per visitor |
| Simplifying checkout | Checkout completion rate |
| Changing a B2B demo page | Qualified demo rate |
| Shortening a lead form | Qualified lead rate |
| Improving SaaS onboarding | Onboarding completion or activation rate |
| Testing bundles or upsells | Revenue per visitor |
Why choose one?
Because a test can move several metrics in different directions.
Imagine you shorten a B2B demo form.
The new version produces:
- 25% more form submissions
- 10% fewer qualified leads
- no increase in opportunities
Did the test win?
That depends entirely on what you decided mattered before launching it.
If your primary KPI was form submission rate, you may call it a win.
If your primary KPI was qualified demo rate, it may be a loss.
That is why you should decide the primary KPI before you look at the results, not after.
A good primary KPI should therefore answer three questions:
Will the result help us decide whether to keep, change, or reject the idea?
Does it measure the outcome that this change is supposed to affect?
Can the test realistically move it?
3. Add 2–4 diagnostic KPIs
Your primary KPI tells you whether the result improved.
Diagnostic KPIs help you understand what changed inside the funnel.
For example, imagine you redesign a product page and revenue per visitor increases.
That is useful. But you still want to know why.
You might also look at:
- add-to-cart rate
- cart-to-checkout rate
- average order value
Suppose the results are:
- Revenue per visitor: +12%
- Add-to-cart rate: +18%
- Cart-to-checkout rate: no meaningful change
- Average order value: -3%
Now you know much more.
The page appears to be convincing more people to add the product to the cart, and that increase is large enough to outweigh the small decline in average order value.
That is what diagnostic KPIs are for.
Do not add ten diagnostic metrics just because they are available.
Choose the few that can help explain the path between the change you made and the primary outcome.
A useful rule is:
Primary KPI: Did the result improve?
Diagnostic KPIs: Where did behavior change?
4. Add 1–3 guardrail KPIs
A test can improve the metric you care about while hurting the business elsewhere.
Guardrail KPIs are the numbers you watch to make sure that does not happen.
For example, let’s say, in an ecommerce test, you introduce a larger discount to increase purchases.
Primary KPI: Purchase conversion rate
Diagnostic KPIs: Add-to-cart rate, checkout completion rate
Guardrails: Average order value, gross margin, return rate
The conversion rate may go up. But if the discount cuts the margin so heavily that the business makes less money, the test is not a real win.
Or, in a SaaS onboarding test, let’s say you remove several onboarding steps to increase completion.
Primary KPI: Onboarding completion rate
Diagnostic KPIs: Completion of each onboarding step
Guardrails: Activation rate, support requests, early churn
More users may finish onboarding simply because you made it shorter. But if fewer users actually understand the product or grasp its core value, a higher completion rate is misleading.
This is not just a theoretical concern. Microsoft recommends tracking guardrail metrics because a test can improve its primary KPI while worsening another important part of the experience. In one Bing experiment, automated monitoring helped catch a bug that sent users to a 404 page.
A useful question before every test is:
What could improve on paper while making the business or customer experience worse?
The answer usually points you toward the right guardrail metrics.
Choose the KPI before you run the test
The main takeaway is simple: do not start with the metrics you can track. Start with the business result you want to improve.
For every CRO test, decide these things before launch:
- the one primary KPI that will determine whether the test worked;
- a few supporting metrics that explain where the change happened;
- guardrail metrics that tell you if you improved one number while hurting another.
That keeps you from calling a test a win just because conversions, clicks, or form fills went up.
If you want help identifying which numbers actually matter for your site and turning them into tests that can improve revenue or lead quality, talk to Invesp about your CRO program.